SIGN UP FOR SALLY'S SEA OF SONGS NEWSLETTER!


Showing posts with label Technology. Show all posts

Practical Ways to Use Boom Cards Effectively in Elementary Music

Explore the Versatility of Boom Cards.

With 600+ students, I'll have a paperless classroom, please!

Many of us discovered the awesomeness of self-checking Boom Cards when we were plunged into distance learning during the pandemic. Now, discover the other ways to effectively use Boom Cards to support student learning in a paperless classroom!

Can I say paperless just one more time? My desk gets simply overrun with paperwork. I'm sure it is the desk's fault, right?! In addition to all of the other versatile uses below, this is key for me. The self-checking feature is great when I need data or when I wish students to be able to work independently, but the paperless is great ALL the time!

What are Boom Cards?

 Boom Cards are a type of digital task card that offers an interactive and self-checking learning experience. They are internet activities designed to be used on computers, laptops, tablets, and interactive whiteboards and are a fun and engaging way to deliver lessons, quizzes, and assessments. 

These digital task cards are interactive, allowing students to directly interact with the content. Students love the video game feel to the activities and become totally engaged. I love the fact that they are self-checking, providing immediate feedback on their answers. With Boom Cards, teachers can create engaging and interactive learning experiences that are easy to administer and provide real-time feedback to students.

Read on to see how I use digital resources like Boom Cards in my classroom.


Display on an Interactive Whiteboard
Use digital resources and Boom Cards as an introduction or a review of music concepts.
Use as a preview or demonstration prior to assigning them for individual or center use.

Send to Classroom Computers for Use in Music Centers
Assign "Fast Pass" self-grading decks for use in music centers when you want to keep students engaged but don't necessarily need to keep data. (more about this in a minute...)

Send to Individual Student Devices
Assign to Individual student Boom accounts for easy access to the data record of student scores.
Assign through Google Classroom or other learning management systems for individual review or assessment.


A Few More Features

A great feature of Boom Cards is the ability to use fast pins, which are links that make it simple to distribute the cards to individual student devices or to a classroom music center computer. This makes it easy to use Boom Cards in a variety of settings and ensures that students have access to the resources they need to succeed. Fast Pins + Free Account = All you need to get started!
 
One of the advantages of Boom Cards is that they can be easily integrated with other digital tools. For example, you can add the link to your Google Classroom or learning platform to make it easy for students to access the cards. 
 
With a premium account, Boom Cards can also be used as an independent assessment for each student, providing valuable data on their progress and performance. Administrators love data, and with the engaging video game-like format, students won't even know they are being assessed!

Ready to Start? Try a Free Sample Deck

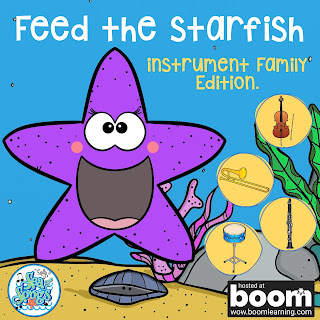
Have you tried them with your music students? Check out this free sample: Feed the Starfish Instrument Family Edition. After signing in to your account, click on "Add to Library" to get started!


These resources are internet activities and require an internet connection for use. 

When purchasing Boom Cards on TPT, you will download a PDF document that includes directions and the link to access your resource on Boom Learning.

As you explore these new resources, be sure to click on the link in each product description to see the preview on the Boom Learning site!

I hope you will consider these Boom Cards decks for use with your students!


Musically yours,


Practical Ways to Use Boom Cards Effectively in Elementary MusicPractical Ways to Use Boom Cards Effectively in Elementary Music


Teacher icons created by Bert Flint - Flaticon Class icons created by Dreamstale - Flaticon Online class icons created by Freepik - Flaticon
I am linking up with Mrs. Miracle's Music Room for Worked for Me Wednesday.


Do you ever just need a minute?  A minute to get yourself together before beginning the next class?  Or, a minute to find that set of manipulatives that you buried on your desk?  Or, a minute to calm down a child who is came in the room in a grumpy mood?  I do.  All the time!


Executive Skills are the skills that we use to be great singers.  They are all of those things that we tell our students regularly, like stand up tall, inhale deeply from your diaphragm, feel your breath belt.  Executive Skills also include mask awareness and vocal placement.  Practicing these skills often happens at the beginning of a class or rehearsal.

How does this help to give me a minute?   Automated PowerPoint shows to the rescue!  Each one of the executive skills is demonstrated with animated clip art to lead students in their vocal warm-ups.  When I first introduced these slides, I definitely stood at the front of the room and demonstrated or explained each slide.   Now, the students can complete the whole thing without my help, allowing me about 3 minutes to take roll, or deal with an unhappy child, or just breathe along with the students.

My friend Chandra gave me this idea, and it has worked so well that I have created one or two different sets for each month of the year.   I change the music and the clip art to reflect the season or holiday of the month, and I change an activity or two so we are not always doing exactly the same thing. 

I have use these successfully with every grade from 1st through 5th.  However, now that I have been doing this activity for several years, my 5th graders this year are much less engaged.  That is my next project: find something engaging for 5th grade to do at the beginning of class! 

Click on the link below to download my April Executive Skills PowerPoint.  Check out the notes view for hints on how to use each slide.  The animations will only work in Presentation mode!  


UPDATE:  Several folks had trouble getting the sound file to play.  I have now included the actual sound file in the download. Save it into the same folder as the PowerPoint.  If the embedded file still doesn't play on your machine, reinsert the sound file on slide 3.  Directions are on the Notes page for slide 3.  

For more ideas that work for real music teachers, follow the Worked for Me Wednesday link or click on the picture at the top of the page.


Assessing student performances is time-consuming!  It is often difficult to make an accurate judgment on the fly, because things happen so fast that it is hard to "record" all of the info in our brains in real time.  Recording student performances for assessment purposes has been a teacher trick that solved this problem for many years.  With the growing use of individual technology devices in schools everywhere, recording student performances is easier than ever.


I am fortunate to have access to a class set of iPods.  For this assessment project, we used the video camera that is built in to the iPod for the video and a Google Form for the rubric.  The following steps assume that your students are ready for performance.

Step 1 Demonstrate

Most kids have some experience with pictures and recordings on phones, so you may or may not have to do too much explaining.  I moved through a quick demonstration just to reinforce the fact that students should all be working with the video camera, how to switch from the still camera to the video camera, how to switch to the front-facing camera, and how to start and stop the recording.

Before passing out the iPods, the school/class rules for use were reviewed.  My backup plan for students who choose not to follow the rules is to take their iPod away, then I recorded them with my iPod.


Step 2 Record

I am fortunate to have a nice sized room and medium sized classes, so we were able to spread around the perimeter of the room, with a few scattered in the middle, so that students had personal space and the sound from one student didn't end up in another's recording.  If space is an issue, try the buddy approach, with one student as the videographer while the partner is performing.


My 5th grade students were singing a blues verse that they composed to a prerecorded track.  I played the track and let them record a practice version.  They ended up getting 3 or 4 chances to get a recording that they were satisfied with.

Step 3 Student Self-Assessment

Students were given time to watch their video several times, and then it was time to complete a self-assessment rubric.  We used a rubric that students had helped to create in a previous lesson.  I created a Google Form with one question for each performance dimension.  The levels of performance were checkboxes, to facilitate ease of use for the students.


As an extra layer of technology fun, I created a QR code to link to the Google Form.  Students scanned the code to bring up the form on their iPods.  QR codes could be displayed on your IWB, enlarged to post on classroom walls, or printed on paper and distributed to students.  Once the rubric is open on the iPods, students only have to tap the checkboxes to record their ratings.

 You can make your own copy of the actual rubric by following this link

Blues Performance Assessment Rubric

Step 4 Teacher Assessment

I couldn't wait to see their videos!  After school, when all was quiet, I watched each one.  Using the exact same rubric, I recorded my rating for their performance.  To indicate which rating was the teacher rating, I entered the student name followed by **********.

The cool thing about Google Forms is that all of the responses are recorded into a spreadsheet, making it very easy to read, and even allowing the resorting of data if necessary.  You can see from the excerpt below that many times the students were harder on themselves than I was!


Step 5 Teacher Reflection

I loved this project because the student engagement was so high that the ratings were a very accurate representation of the student's work.  In the future, I think I will add a short written component to the student self-assessment, asking them to explain why they gave themselves the rating that they did.

Sharing our Project  

The QR worksheets, links, Yonder Come Day videos, and our presentation slides from SCMEA can be found here:


Please comment on whether this use of technology would be useful to you!

More on how QR codes can be used to facilitate student research projects can be found in this post: QR Codes & Student Engagement


Click on the pictures for more Fermata Fridays or Tech Talk Tuesday posts!


This mid-winter break is really a time for reflection and planning for teachers!  I started out thinking about what my 5th graders need to do in January and that brought up memories of a now favorite series of lessons that were developed jointly with a super student teacher a few years ago.

We had a particularly tough group that year, and were definitely in survival mode, even though there were two of us in the classroom. The school had just purchased a class set of iPods and no one else was using them yet, so using the technology seemed like the perfect hook.


The overall plan was to look into the cultural connections between Gullah music, which originated right near us on the sea islands of South Carolina and Georgia, and the blues. We wanted the students to have some historical knowledge, but also some experience listening to and singing the music from both genres.

Step 1 Research

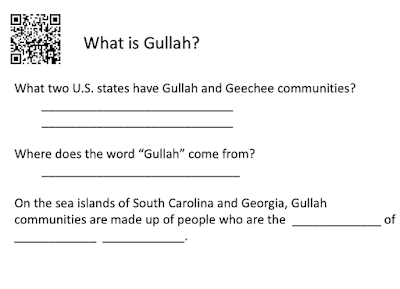
What did we want the students to know about Gullah music?  We created a knowledge-seeking worksheet based on information found on the wonderful Gullah Music section of www.knowitall.org.  The fun part of this is using the QR codes to "magically" open the correct website.  A simple Google search will pull up many QR code generators.  We used the one at http://qrcode.kaywa.com/.   Here is a sample section of our worksheet:


I'm not sure if the screenshot of the QR will work for you, so here is the actual page that this one leads to: 
https://www.knowitall.org/series/gullah-culture

Remember those tough 5th graders?


Not a peep as they were totally engaged in the fact finding activity!

Step 2  Listen and Sing

Next, we engaged the students in a discussion of what makes a singing performance a good performance, creating lists in the board of various attributes and then specifying the criteria for excellence.  Some of the attributes were singing voice, rhythmic accuracy, tempo, and expression.  They were creating a rubric and they didn't even realize it!

After developing the rubric, we listened to several YouTube videos of Yonder Come Day sung by Gullah Singers and several school choirs.  Students were more engaged in the listening because they knew something of the culture from their QR research, and they knew what they should be listening for musically because they developed the rubric.  It was easy to discuss each video using musical terms and historical facts.

Hearing the song repeated several times also prepared the students to sing it.  Of course, they also had to rate their own performance using the same rubric that they developed for the YouTube videos!

Sharing Our Project

The QR worksheets, links, Yonder Come Day videos and our presentation slides from SCMEA can be found here:  


Look for the next steps, performance evaluation using the iPods and Google Forms, in this post:   Tech Talk Tuesday - iPods as Assessment Tools


Interested in Gullah Culture?

SCETV has a wonderful set of resources for elementary students.  I hope you will look them over!


Click on the Fermata Fridays logo to find other great music education blogs!